Using the Blind Proxy
This guide introduces you to the Blind Proxy, an application you run locally on your system that transparently encrypts, decrypts, and searches your data using the keys it derives from a cryptographic keyring which you control.
Before you Begin
You will need a Blind Insight account to follow these instructions. Please be sure to register for a Blind Insight account before proceeding. You will need use your email and password to utilize the Blind Proxy.
About the Blind Proxy command
The blind command-line (CLI) tool utilizes the Blind Proxy under the hood. The Blind Proxy is able to operate in two modes:
- Server mode - This is the mode used when running
blind proxy. It operates as a web server which provides both the proxy service and the web interface. - Inline mode - This mode uses the proxy service internally but does not require the server to be running. This allows the CLI to operate independently while still using the Blind Proxy internally.
It is important to clarify these because we want to emphasize that it’s not magical and that in all operating modes, the Blind Insight API is always used to authenticate you and to store and provide your data on the backend.
Data Security built-in
No clear text data ever enters or exits Blind Insight's cloud environment.
Take note
The Blind Proxy is required to encrypt, search, and decrypt your data.
Warning
The Blind Proxy is under active development. If you encounter any issues, please ensure you are using the latest version of the Blind Proxy for your operating system.
Download the Blind Proxy command
Download the Blind Proxy for your operating system and return to this page!
Extract the archive and you'll find a blind executable contained within.
Run the Blind CLI
The Blind Proxy must be run in a terminal. Please open a terminal of your choice (such as Terminal.app on MacOS or Konsole on Linux). You will run all commands in this walkthrough using ./blind relative to where you downloaded it.
Microsoft Windows Users
On Windows the command is blind.exe instead of blind.
Note
We highly recommend you change to this directory and use it as your working directory, for example:
Interactive Help
The blind command is self-documenting and provides interactive help. If you ever get stuck and want to know what arguments are required or available, just add the --help flag:
Tip
This guide covers the most common workflows. For the full list of commands and options, use --help on any subcommand.
Create your Keyring
About keyrings
The Blind Proxy stores your seed phrase, from which all of your keys are derived, in a keyring. You’ll need one to use the service. (We'll integrate with popular KMSs in the future!)
Initialize your Keyring
Start by initializing your keyring.
Upon creation, the seed phrase is stored in your system’s password manager. This is “Keychain” on MacOS, “Secret Service” on Linux, or “Credential Locker” on Windows.
Run blind keyring create and confirm that you would like to create a new keyring:
$ ./blind keyring create
┃ Would you like to generate a new seed phrase?
┃
┃  Yes   No

←/→ toggle • enter submit
Inspect your Keyring
After creating your keyring, run blind keyring inspect and confirm that you would like to view the seed phrase for your keyring:
$ ./blind keyring inspect
┃ Are you sure you want to inspect the keyring?
┃ This will reveal secrets in the keyring.
┃
┃  Yes   No

←/→ toggle • enter submit
Exercise caution before displaying your seed phrase in production implementations. On some systems, accessing this for the first time may prompt you to allow permissions:
$ ./blind keyring inspect
┃ You may be prompted to unlock your keyring several times.
┃  Select "Always Allow" to reduce prompting in the future.
┃ Press enter to continue
┃ >
$ ./blind keyring inspect
Your seed phrase:
 wife number card nest index milk place increase innocent oak pledge excuse glow scare april region filter athlete mixed leopard endorse clock north tree
Keep your seed phrase safe or you will lose access to your keyring!
No credentials found in your keyring. Please save them using 'blind login'.
Back up your seed phrase
It is critical that you back up this seed phrase. If you lose it, all data you upload to Blind Insight will NOT be able to be decrypted. In the future, we'll have features in place to help prevent this from happening.
Data Security
Blind Insight does not store your seed phrase or any keys generated from it.
You will see a message that “No credentials” were found in your keyring. Let's get those added.
Login to the API
Run blind login to store your API credentials in your keyring and enter your username and password when prompted:
$ ./blind login
┃ Email
┃ This doubles as your username.
┃ > demo@localhost

enter submit
┃ Password
┃ Enter your password.
┃ > ************

enter submit
Upon success, you’ll see the message “Credentials saved.”.
Run blind keyring inspect again, confirming the prompts to display your keyring information. Your credentials should be displayed with the message “Your keyring is ready to use.”
Now let’s add some data.
Organizations
Organizations in Blind Insight represent an isolated tenant with its own users and datasets.
To view the Organizations of which you are a member, run blind organization list:
Important
The Organizations listed for you will differ from what is in the example below. The slug will be a normalized version of the name you selected for your Organization when you first registered your account.
Please note this slug value, as you'll be using it to work with objects throughout this guide.
The output of which should look something like this:
[
  {
    "id": "mR62wFPDbKs8nvoTeCSoZX",
    "url": "http://api.app.blindinsight.io/api/organizations/mR62wFPDbKs8nvoTeCSoZX/",
    "name": "Demo",
    "slug": "demo",
    "created": "2024-05-03T00:01:25.138275Z",
    "modified": "2024-05-03T00:01:25.138407Z",
    "owner": "http://api.app.blindinsight.io/api/organizations/mR62wFPDbKs8nvoTeCSoZX/owner/",
    "is_active": true
  }
]
Take note
To understand Organizations deeper, please refer to the Organizations page.
Create a Dataset
Data in Blind Insight is grouped by datasets. A dataset might be analogous to a database. A dataset may contain one or more “schemas”, which are used to define the shape of your data. We’ll cover those in the next section.
A dataset is pretty simple in that it’s really just a name used to categorize your data.
Note
You may have been directed to this documentation from the web UI tour, and created your first Dataset in your web browser. If so, please go ahead and follow along to create another Dataset here, to make it easier to follow the rest of this guide!
Every dataset must have a human-readable name, but the name is not required to be unique. Upon creation, a machine-readable "slug" is generated from the name you chose. The slug must be unique, and will be used to identify the dataset in this guide. Please note the slug of your newly-created dataset.
Let’s go ahead and create a dataset called “people” with a description of “Personnel Data” using blind dataset create:
The output might look like this:
{
  "id": "kqeVTircfhcEEEr9DocACK",
  "name": "People",
  "slug": "people",
  "description": "Personnel Data",
  "url": "https://api.app.blindinsight.io/api/datasets/kqeVTircfhcEEEr9DocACK/",
  "organization": "http://api.app.blindinsight.io/api/organizations/mR62wFPDbKs8nvoTeCSoZX/"
}
That’s it! Now let’s create your first schema.
Create a Schema
Schemas define the shape of your data. You can think of a schema like a table in a database.
Schemas are declared using the JSON Schema specification.
Let's create a basic “person” schema with two required fields:
name: A string fieldage: An integer field with a minimum of1and maximum of100
Note
Numeric field types must always have a minimum and a maximum. For example, age is an integer field with a minimum of 1 and maximum of 100.
Here is what this basic schema looks like:
{
  "type": "object",
  "properties": {
    "name": {
      "type": "string"
    },
    "age": {
      "type": "integer",
      "minimum": 1,
      "maximum": 100
    }
  },
  "required": ["name", "age"]
}
Copy and paste this schema into a new text file.
Save the file as person_schema.json in the same directory in which you're running the blind command.
Note
The schema file must not only be valid JSON, but must also be a valid JSON Schema! It is validated upon upload.
Run blind schema create to create a schema called “person” in the people dataset.
./blind schema create --name Person --dataset people --organization demo --description "A person has a name and an age" --file ./person_schema.json
The output might look like this:
{
  "id": "S5oce9zaHfSznFyv28agEu",
  "url": "https://api.app.blindinsight.io/api/schemas/S5oce9zaHfSznFyv28agEu/",
  "description": "A person has a name and an age",
  "name": "Person",
  "slug": "person",
  "dataset": "https://api.app.blindinsight.io/api/datasets/kqeVTircfhcEEEr9DocACK/",
  "schema": {
    "properties": {
      "age": {
        "maximum": 100,
        "minimum": 1,
        "type": "integer"
      },
      "name": {
        "type": "string"
      }
    },
    "required": ["name", "age"],
    "type": "object"
  }
}
Tada! We have a schema!
Now, let’s upload some records! This is where it gets interesting.
Insert Records
Records represent data that conform to a schema. You can think of records as rows in a database table. Each record field is encrypted using a unique key generated from the schema derived from keys in your keyring.
Below is some sample personnel data for the person schema:
[
  {
    "data": {
      "name": "Alice",
      "age": 17
    }
  },
  {
    "data": {
      "name": "Bob",
      "age": 69
    }
  },
  {
    "data": {
      "name": "Jake",
      "age": 41
    }
  },
  {
    "data": {
      "name": "Jathan",
      "age": 47
    }
  },
  {
    "data": {
      "name": "Jackie",
      "age": 47
    }
  },
  {
    "data": {
      "name": "Peewee",
      "age": 3
    }
  }
]
Copy and paste these records into a new text file and save it in the same directory. Let's call it person_data.json.
Next, upload these records into our person schema using blind record create:
./blind record create --organization demo --dataset people --schema person --file ./person_data.json
The output might look like this:
Note
When records are uploaded, they are first validated against the selected schema. Invalid data cannot be uploaded because the schema is critical in the automatic encryption.
Data Security
Records are encrypted locally, using the Blind proxy and keys that you control prior to being uploaded to Blind Insight.
Let’s dig into what just happened...
Inspect your Records
When displaying records, you must provide a schema, to specify which records you would like to display. You can run blind record list to display the data you just uploaded with different arguments based on your use-case.
You have one of two options here:
- You may provide only the
--schemaargument, but the value of this argument must be the uniqueidof the schema. This is more concise, however it is not as user-friendly. For example, using the schema created in Create a Schema you would provide the argument--schema S5oce9zaHfSznFyv28agEu.
- Or, you may provide the
slugof the schema to the--schemaargument, however you must also provide--organizationand--datasetslugs. This is more verbose, but much more user-friendly. For example, using the organization, dataset, and schema created in previous steps, you would provide the arguments--organization demo --dataset people --schema person.
Here we'll use blind record list to display the data you just uploaded, using the 2nd option:
The output might look like this:
[
  {
    "data": {
      "10d5371d8a1660df46c23f894182aaf3f80cce97524eca90e02b23fca3e8a15d": "4eec323798f792522a9ddd526b9826ab5c099eb6b231b939ed7fd00d95f0de284589e9a0",
      "80815d02f0c7b5011e12c2ab9825dd5d9690fdaae19ccac762edebf3d43b536d": "f34aeb664843d46fde8a4de1f0a945a460dba8666c33bcd86eea18ffffa73f0110"
    },
    "id": "AkijS8Zti5oNE5xaYeWk3b",
    "schema": "https://api.app.blindinsight.io/api/schemas/S5oce9zaHfSznFyv28agEu/",
    "url": "https://api.app.blindinsight.io/api/records/AkijS8Zti5oNE5xaYeWk3b/"
  },
  {
    "data": {
      "10d5371d8a1660df46c23f894182aaf3f80cce97524eca90e02b23fca3e8a15d": "8070e2f9a8b04142df3f08632a83879e6d712a934cf3c5b14ed1d90bb1dec8b936b11c00",
      "80815d02f0c7b5011e12c2ab9825dd5d9690fdaae19ccac762edebf3d43b536d": "008f25a54a9a3ba55cf5a0c63c44415560cc913b5169d143155fa2621040f2"
    },
    "id": "X8tfZpcigKgtodGJrP5Aqn",
    "schema": "https://api.app.blindinsight.io/api/schemas/S5oce9zaHfSznFyv28agEu/",
    "url": "https://api.app.blindinsight.io/api/records/X8tfZpcigKgtodGJrP5Aqn/"
  },
  {
    "data": {
      "10d5371d8a1660df46c23f894182aaf3f80cce97524eca90e02b23fca3e8a15d": "10c1b66e759e405973649e4e471e89ea97fa3d397958985b904a8f5e3fe8b383b5342815",
      "80815d02f0c7b5011e12c2ab9825dd5d9690fdaae19ccac762edebf3d43b536d": "c15cffe0b4a51f8ed430746695ce3475cebf7d1d041585cbc2f2689349ddcafb"
    },
    "id": "EBbfp3He9AFNqizxwjRY96",
    "schema": "https://api.app.blindinsight.io/api/schemas/S5oce9zaHfSznFyv28agEu/",
    "url": "https://api.app.blindinsight.io/api/records/EBbfp3He9AFNqizxwjRY96/"
  },
  {
    "data": {
      "10d5371d8a1660df46c23f894182aaf3f80cce97524eca90e02b23fca3e8a15d": "9bdde299acb170e033e739d8e1f1460c73e1c18d725c51a5b6b3134a4d5ac6a497d57ab6",
      "80815d02f0c7b5011e12c2ab9825dd5d9690fdaae19ccac762edebf3d43b536d": "6841b6608bfedbb6aba77b83ccbe2f960fd2426aee4fc2828d9b94ab5b8db158cb29"
    },
    "id": "QATjV2Lammj5BoT2kKHoVo",
    "schema": "https://api.app.blindinsight.io/api/schemas/S5oce9zaHfSznFyv28agEu/",
    "url": "https://api.app.blindinsight.io/api/records/QATjV2Lammj5BoT2kKHoVo/"
  },
  {
    "data": {
      "10d5371d8a1660df46c23f894182aaf3f80cce97524eca90e02b23fca3e8a15d": "bb444fd9f8b8dbfd10ac70c79c71a0e9535d16b5e84ba9aab60447562d04f41038d2a1a4",
      "80815d02f0c7b5011e12c2ab9825dd5d9690fdaae19ccac762edebf3d43b536d": "2e6b577e171b770c037cee617b8059e997d75ad302cb1f9b0f6756e3360a55d52b79"
    },
    "id": "Zgj2Nh9PARo9RudNvtU4Xd",
    "schema": "https://api.app.blindinsight.io/api/schemas/S5oce9zaHfSznFyv28agEu/",
    "url": "https://api.app.blindinsight.io/api/records/Zgj2Nh9PARo9RudNvtU4Xd/"
  },
  {
    "data": {
      "10d5371d8a1660df46c23f894182aaf3f80cce97524eca90e02b23fca3e8a15d": "28f9634ed0cbe9f1efeb0bfbf724712736a621282aff84063fe3eb34531101b096ccf831",
      "80815d02f0c7b5011e12c2ab9825dd5d9690fdaae19ccac762edebf3d43b536d": "0ab5756a083bb3715ea6004d6a19cf9c3d6ad2fb00c3d39a5911fde676513c2740f9"
    },
    "id": "m8gDRbgUzoP88ixsfPmGMu",
    "schema": "https://api.app.blindinsight.io/api/schemas/S5oce9zaHfSznFyv28agEu/",
    "url": "https://api.app.blindinsight.io/api/records/m8gDRbgUzoP88ixsfPmGMu/"
  }
]
It’s encrypted!
When you uploaded your data, the Blind Proxy automatically used the schema definition to generate field encryption keys using your keyring, and encrypted each field using those keys.
Well, encrypted data isn’t all that useful. So, let’s decrypt it.
Decrypting your Records
Just as in the previous step, you'll be running blind record list with the appropriate arguments to filter by your schema.
Decrypting is easy! Just pass the --decrypt flag:
The output might look like this:
[
  {
    "data": {
      "age": 17,
      "name": "Alice"
    },
    "id": "AkijS8Zti5oNE5xaYeWk3b",
    "schema": "https://api.app.blindinsight.io/api/schemas/S5oce9zaHfSznFyv28agEu/",
    "url": "https://api.app.blindinsight.io/api/records/AkijS8Zti5oNE5xaYeWk3b/"
  },
  {
    "data": {
      "age": 69,
      "name": "Bob"
    },
    "id": "X8tfZpcigKgtodGJrP5Aqn",
    "schema": "https://api.app.blindinsight.io/api/schemas/S5oce9zaHfSznFyv28agEu/",
    "url": "https://api.app.blindinsight.io/api/records/X8tfZpcigKgtodGJrP5Aqn/"
  },
  {
    "data": {
      "age": 41,
      "name": "Jake"
    },
    "id": "EBbfp3He9AFNqizxwjRY96",
    "schema": "https://api.app.blindinsight.io/api/schemas/S5oce9zaHfSznFyv28agEu/",
    "url": "https://api.app.blindinsight.io/api/records/EBbfp3He9AFNqizxwjRY96/"
  },
  {
    "data": {
      "age": 47,
      "name": "Jathan"
    },
    "id": "QATjV2Lammj5BoT2kKHoVo",
    "schema": "https://api.app.blindinsight.io/api/schemas/S5oce9zaHfSznFyv28agEu/",
    "url": "https://api.app.blindinsight.io/api/records/QATjV2Lammj5BoT2kKHoVo/"
  },
  {
    "data": {
      "age": 47,
      "name": "Jackie"
    },
    "id": "Zgj2Nh9PARo9RudNvtU4Xd",
    "schema": "https://api.app.blindinsight.io/api/schemas/S5oce9zaHfSznFyv28agEu/",
    "url": "https://api.app.blindinsight.io/api/records/Zgj2Nh9PARo9RudNvtU4Xd/"
  },
  {
    "data": {
      "age": 3,
      "name": "Peewee"
    },
    "id": "m8gDRbgUzoP88ixsfPmGMu",
    "schema": "https://api.app.blindinsight.io/api/schemas/S5oce9zaHfSznFyv28agEu/",
    "url": "https://api.app.blindinsight.io/api/records/m8gDRbgUzoP88ixsfPmGMu/"
  }
]
How about that!
"But what if I want to analyze the encrypted data?", you say. What a great question! Drumroll, please...
Searching Encrypted Records
Searching records is simple. Input labels and values in clear text, and the Blind Proxy will automatically encrypt the query for you and pass it to the Blind Insight API.
Search Filter Limitations
Search is limited to logical AND statements at this time. Support for logical OR and NOT filtering between filters is coming in a future release!
Using blind record list you may use the --filter arguments to perform encrypted search by key/value pairs on your records. A colon separates the key and value for each time you provide the argument. Multiple filters can be provided, each acting as a logical AND statement. (Example: --filter "key1:value1" --filter "key2:value2")
Hint
You don't always have to wrap the value provided to --filter in quotes, but in some cases certain characters might be interpreted by the shell with unexpected results. Quoting them prevents this from happening, so in our examples we will always quote --filter values.
Let’s search for people whose age is 47. There should be two results:
The output might look like this:
[
  {
    "data": {
      "10d5371d8a1660df46c23f894182aaf3f80cce97524eca90e02b23fca3e8a15d": "9bdde299acb170e033e739d8e1f1460c73e1c18d725c51a5b6b3134a4d5ac6a497d57ab6",
      "80815d02f0c7b5011e12c2ab9825dd5d9690fdaae19ccac762edebf3d43b536d": "6841b6608bfedbb6aba77b83ccbe2f960fd2426aee4fc2828d9b94ab5b8db158cb29"
    },
    "id": "QATjV2Lammj5BoT2kKHoVo",
    "schema": "https://api.app.blindinsight.io/api/schemas/S5oce9zaHfSznFyv28agEu/",
    "url": "https://api.app.blindinsight.io/api/records/QATjV2Lammj5BoT2kKHoVo/"
  },
  {
    "data": {
      "10d5371d8a1660df46c23f894182aaf3f80cce97524eca90e02b23fca3e8a15d": "bb444fd9f8b8dbfd10ac70c79c71a0e9535d16b5e84ba9aab60447562d04f41038d2a1a4",
      "80815d02f0c7b5011e12c2ab9825dd5d9690fdaae19ccac762edebf3d43b536d": "2e6b577e171b770c037cee617b8059e997d75ad302cb1f9b0f6756e3360a55d52b79"
    },
    "id": "Zgj2Nh9PARo9RudNvtU4Xd",
    "schema": "https://api.app.blindinsight.io/api/schemas/S5oce9zaHfSznFyv28agEu/",
    "url": "https://api.app.blindinsight.io/api/records/Zgj2Nh9PARo9RudNvtU4Xd/"
  }
]
And, yes, you guessed correctly. You can also decrypt these results using --decrypt:
./blind record list --organization demo --dataset people --schema person --filter "age:47" --decrypt
The output might look like this:
[
  {
    "data": {
      "age": 47,
      "name": "Jathan"
    },
    "id": "QATjV2Lammj5BoT2kKHoVo",
    "schema": "https://api.app.blindinsight.io/api/schemas/S5oce9zaHfSznFyv28agEu/",
    "url": "https://api.app.blindinsight.io/api/records/QATjV2Lammj5BoT2kKHoVo/"
  },
  {
    "data": {
      "age": 47,
      "name": "Jackie"
    },
    "id": "Zgj2Nh9PARo9RudNvtU4Xd",
    "schema": "https://api.app.blindinsight.io/api/schemas/S5oce9zaHfSznFyv28agEu/",
    "url": "https://api.app.blindinsight.io/api/records/Zgj2Nh9PARo9RudNvtU4Xd/"
  }
]
Finally, if you wanted to filter by a specific person, you could provide filters for name:Jathan and age:47:
$ ./blind record list --organization demo --dataset people --schema person --filter "name:Jathan" --filter "age:47" --decrypt
[
 {
  "data": {
   "age": 47,
   "name": "Jathan"
  },
  "id": "QATjV2Lammj5BoT2kKHoVo",
  "schema": "https://api.app.blindinsight.io/api/schemas/S5oce9zaHfSznFyv28agEu/",
  "url": "https://api.app.blindinsight.io/api/records/QATjV2Lammj5BoT2kKHoVo/"
 }
]
Supported Query Types
Strings
Strings are the most basic type of data in Blind Insight. They are used for text-based data, such as names, addresses, and other free-form text.
String Search Limitations
Only full string matching is supported at this time. Partial (fuzzy) string matching will be added in a future release!
For string types:
- Only equality is currently supported (e.g.
--filter "name:Bob")
Numbers
Numbers are used for numeric data, such as age, price, and other numerical data. Numbers can be integers or floating point numbers.
Integers are whole numbers, such as 1, 2, 3, etc. and are represented as integer in the schema.
Floating point numbers are numbers with a decimal point, such as 1.0, 2.0, 3.0, etc. and are represented as number in the schema.
For integer or number types:
- Equality (Using the plain number value): e.g.
--filter "age:47" >(Greater than): e.g.--filter "age:>40">=(Greater than or equal): e.g.--filter "age:>=47"<(Less than): e.g.--filter "age:<17"<=(Less than or equal): e.g.--filter "age:<=17"~(Range): e.g.--filter "age:40~45"
Aggregation
Aggregation are operations performed on numerical data.
Aggregation Limitations
This feature is currently only supported for integer types. Support for floating point numbers will be added in a future release!
For integer types:
- Average on a range of numbers: e.g.
--filter "age:avg(40~45)" - Sum on a range of numbers: e.g.
--filter "age:sum(40~45)" - Count on a range of numbers: e.g.
--filter "age:count(40~45)" - Min on a range of numbers: e.g.
--filter "age:min(40~45)" - Max on a range of numbers: e.g.
--filter "age:max(40~45)"
The aggregation query works for all supported comparison types such as > (Greater than), >= (Greater than or equal), < (Less than), <= (Less than or equal), ~ (Range). Here are a couple more examples:
- Average on a greater than range of numbers: e.g.
--filter "age:avg(>40)" - Sum on a less than range of numbers: e.g.
--filter "age:sum(<15)" - Count on a less than or equal range of numbers: e.g.
--filter "age:count(<=15)" - Min on a greater than or equal range of numbers: e.g.
--filter "age:min(>=35)" - Max on a less than range of numbers: e.g.
--filter "age:max(<45)"
In this operation, you won't receive the actual records. Instead, you'll get a virtual record containing the aggregation result and the schema from which the data originated.
For example, using the query ./blind record list --organization demo --dataset people --schema person --filter "age:avg(0~99)" we get the result:
[
  {
    "data": {
      "aggregation_type": "avg",
      "value": 36
    },
    "id": "agg-1750201874953178",
    "schema": "https://api.app.blindinsight.io/api/schemas/S5oce9zaHfSznFyv28agEu/",
    "url": "https://api.app.blindinsight.io/api/records/agg-1750201874953178/"
  }
]
Try them out for yourself!
Starting the Blind Proxy
All of the previous steps were familiarizing you what was possible using the command line. The real fun begins when you start the Blind Proxy server itself.
Go ahead and fire up the Blind Proxy and enable debug mode so that you can see log output to your terminal:
The output might look like this:
2024/04/14 14:35:02 DEBU Debug output enabled
2024/04/14 14:35:02 WARN Running in debug mode, this should not be used outside of development!
2024/04/14 14:35:02 WARN Upstream TLS verification is disabled during debug mode
2024/04/14 14:35:02 DEBU Using embedded SSL certificate
2024/04/14 14:35:02 DEBU CORS Allowed Origins globs="[https://*.local.blindinsight.io https://local.blindinsight.io]"
2024/04/14 14:35:02 DEBU Using seed phrase from keyring
[GIN-debug] [WARNING] Running in "debug" mode. Switch to "release" mode in production.
 - using env:  export GIN_MODE=release
 - using code:  gin.SetMode(gin.ReleaseMode)
[GIN-debug] GET   /*any           --> github.com/blind-insight/proxy/pkg/proxy.(*proxy).Route-fm (5 handlers)
[GIN-debug] POST  /*any           --> github.com/blind-insight/proxy/pkg/proxy.(*proxy).Route-fm (5 handlers)
[GIN-debug] PUT   /*any           --> github.com/blind-insight/proxy/pkg/proxy.(*proxy).Route-fm (5 handlers)
[GIN-debug] PATCH  /*any           --> github.com/blind-insight/proxy/pkg/proxy.(*proxy).Route-fm (5 handlers)
[GIN-debug] HEAD  /*any           --> github.com/blind-insight/proxy/pkg/proxy.(*proxy).Route-fm (5 handlers)
[GIN-debug] OPTIONS /*any           --> github.com/blind-insight/proxy/pkg/proxy.(*proxy).Route-fm (5 handlers)
[GIN-debug] DELETE /*any           --> github.com/blind-insight/proxy/pkg/proxy.(*proxy).Route-fm (5 handlers)
[GIN-debug] CONNECT /*any           --> github.com/blind-insight/proxy/pkg/proxy.(*proxy).Route-fm (5 handlers)
[GIN-debug] TRACE  /*any           --> github.com/blind-insight/proxy/pkg/proxy.(*proxy).Route-fm (5 handlers)
Observe that it told you a couple things:
- “Using embedded SSL certificate”
- “Using seed phrase from keyring”
The proxy has an embedded SSL certificate for https://local.blindinsight.io which will serve the web interface directly from your local Blind Proxy instance.
The seed phrase that was generated when we started is utilized to automatically derive encryption keys. As long as it can be found in your system keychain it is used automatically.
Warning
The embedded SSL certificate is short-lived and expires after 90 days. Please make sure you're always downloading the latest version of the Blind Proxy.
Go ahead and click that link and let’s jump into the web interface!
The Web Interface
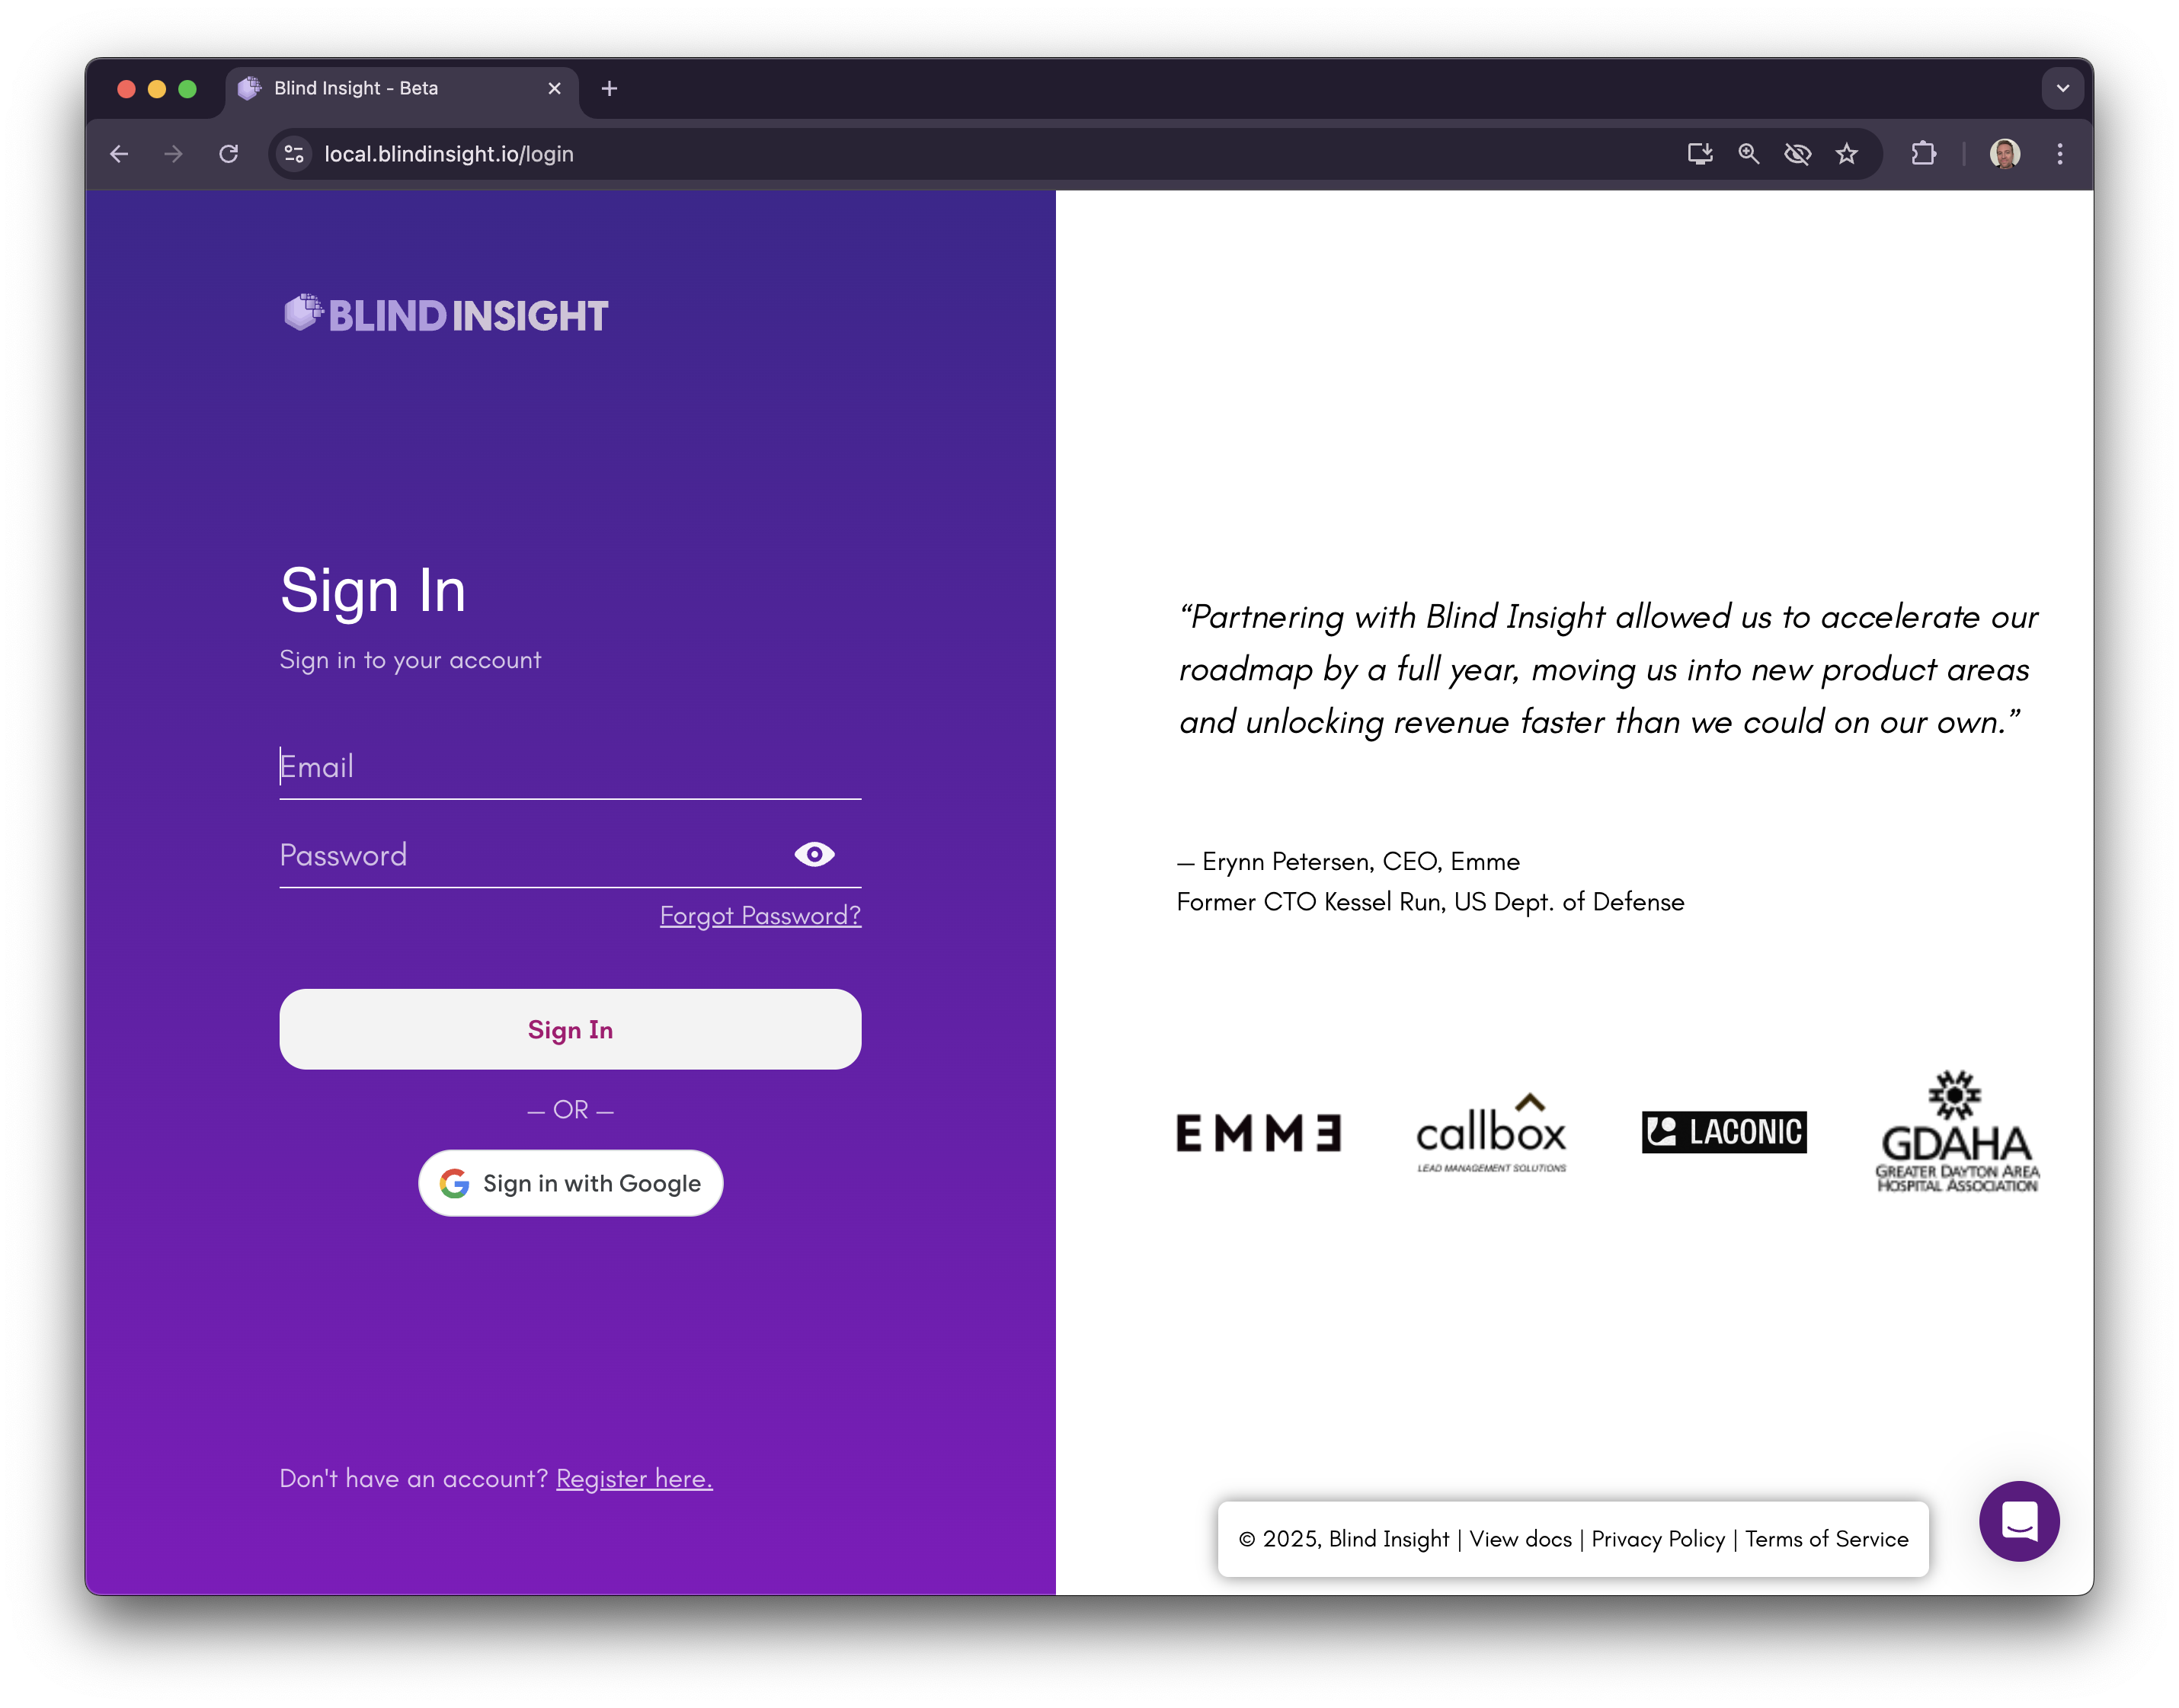
Sign In
Upon visiting https://local.blindinsight.io you’re greeted with a login page. Use your account credentials to login.
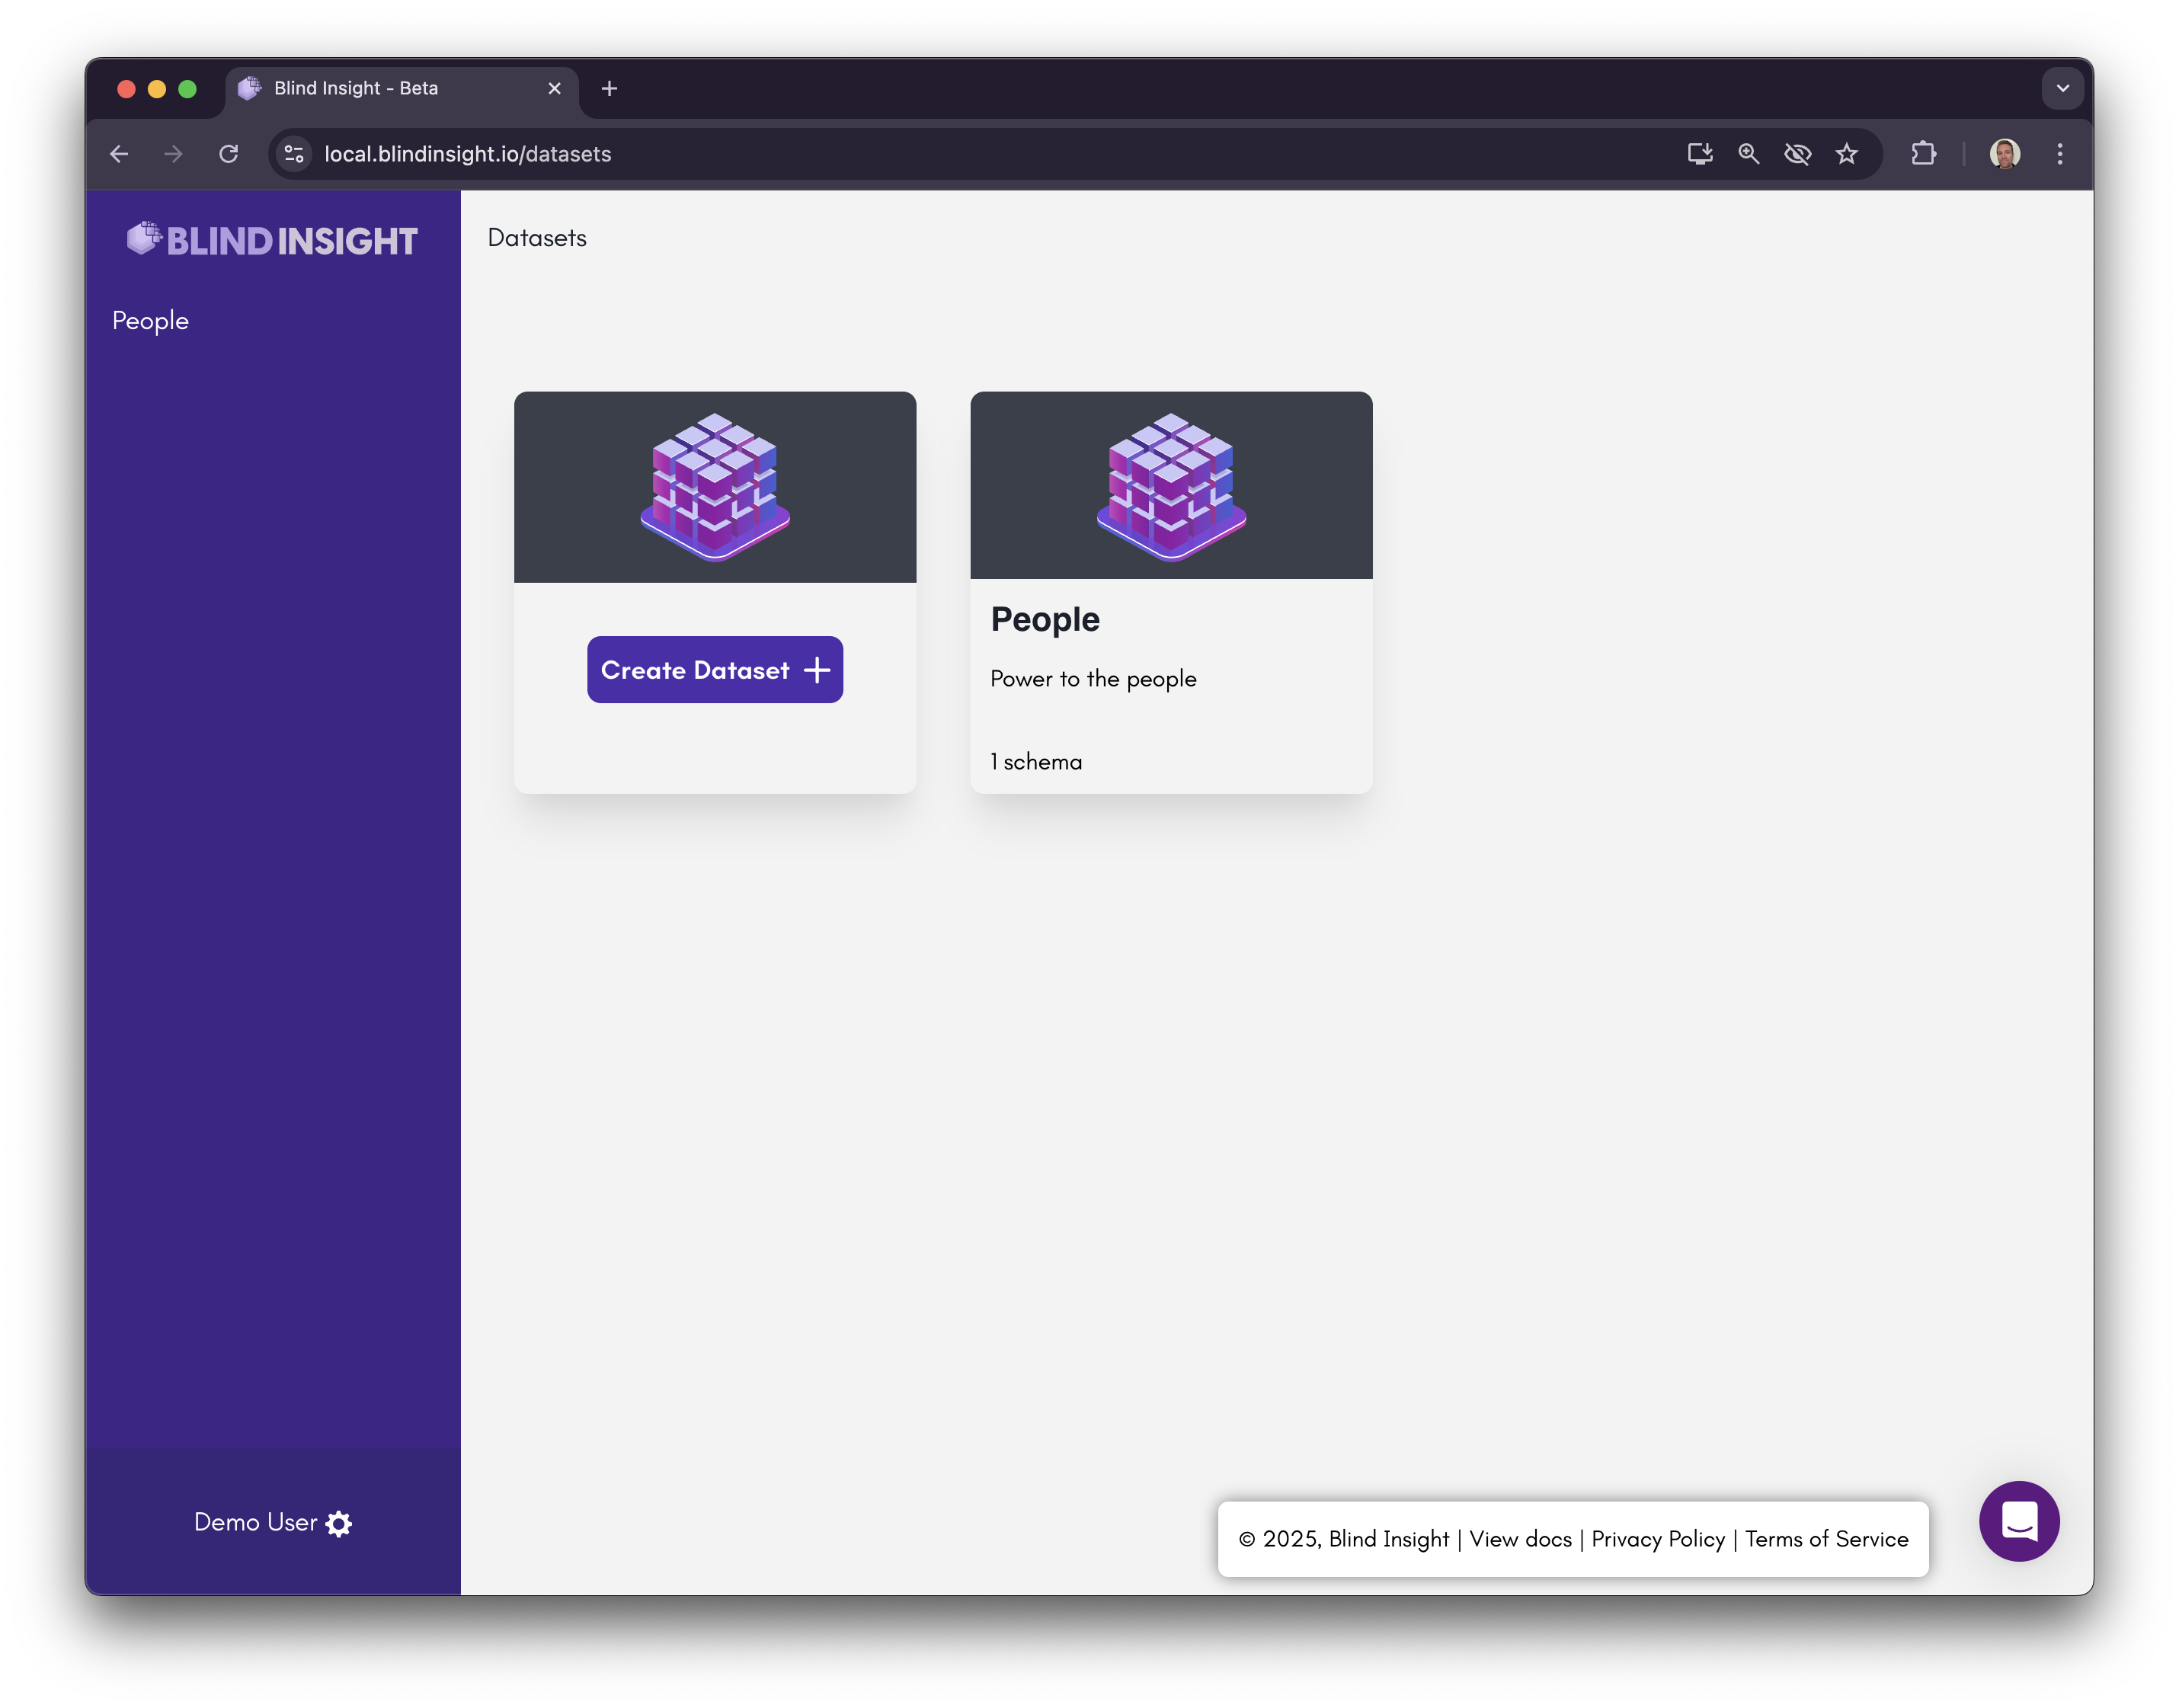
Datasets
Upon login you’re presented with the primary dataset view, showing the “people” dataset.
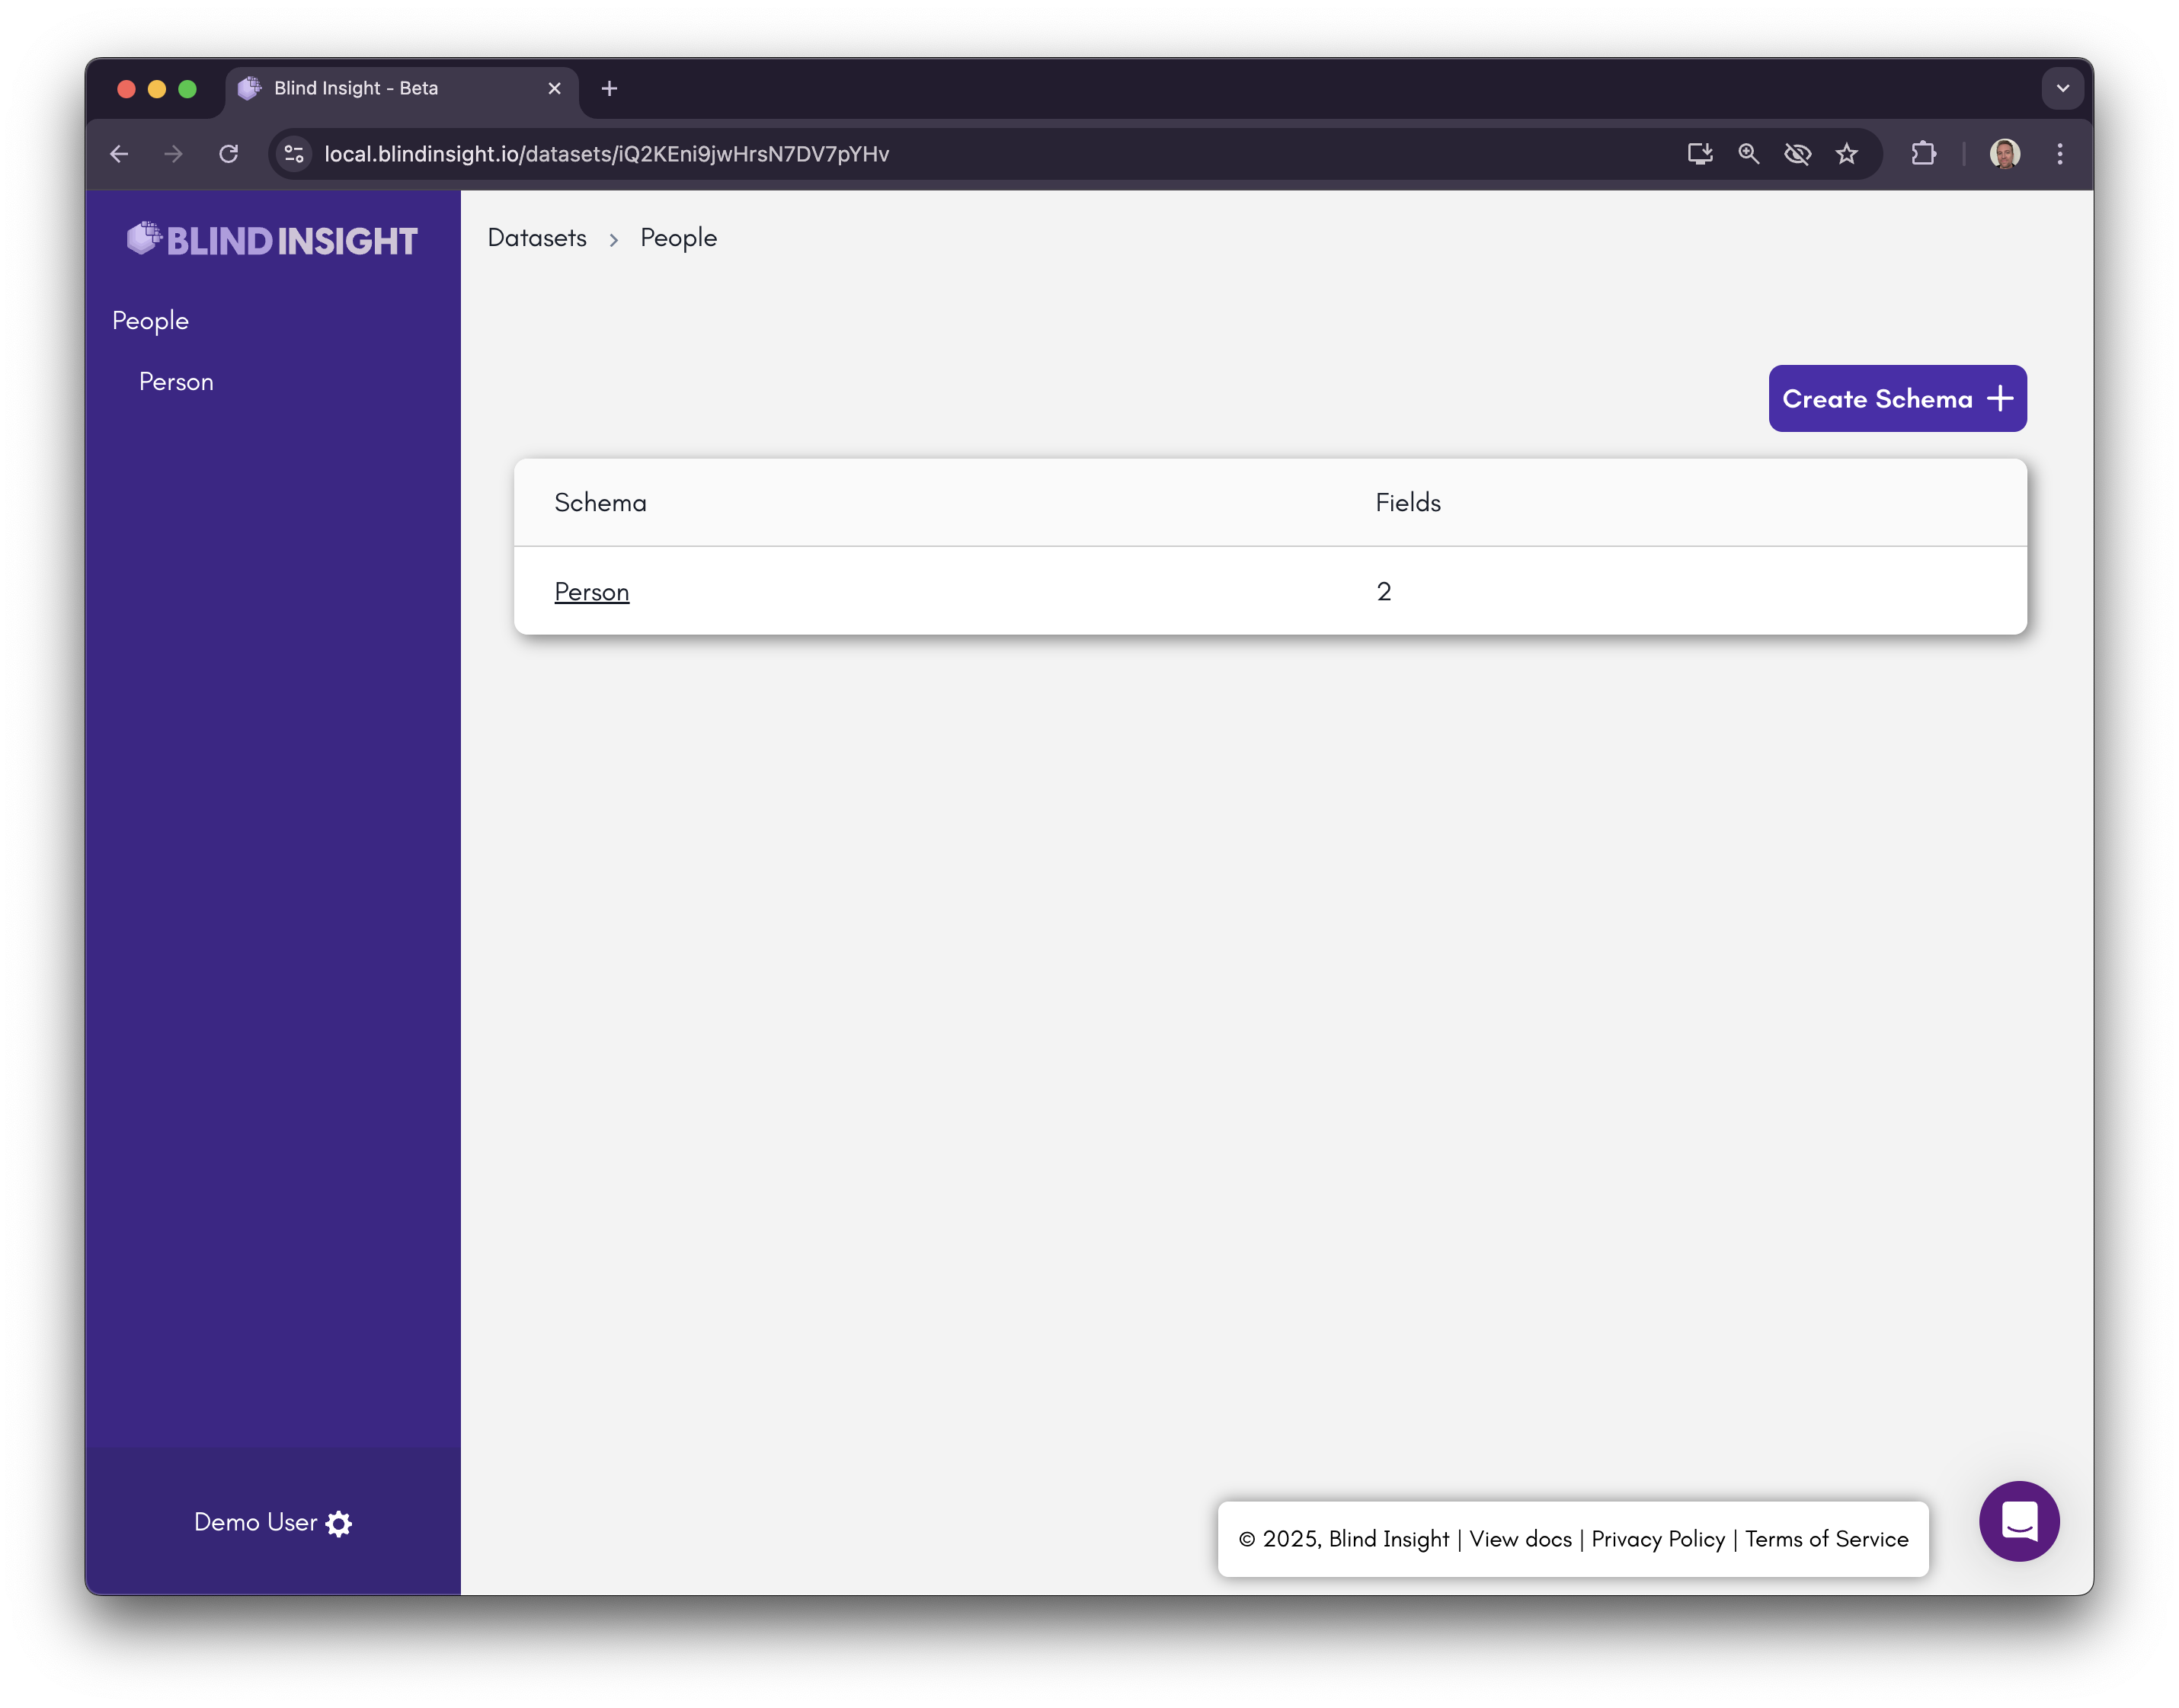
Schemas
Click on that dataset and you’ll be taken to the list of schemas and you’ll see the “person” schema we created earlier.
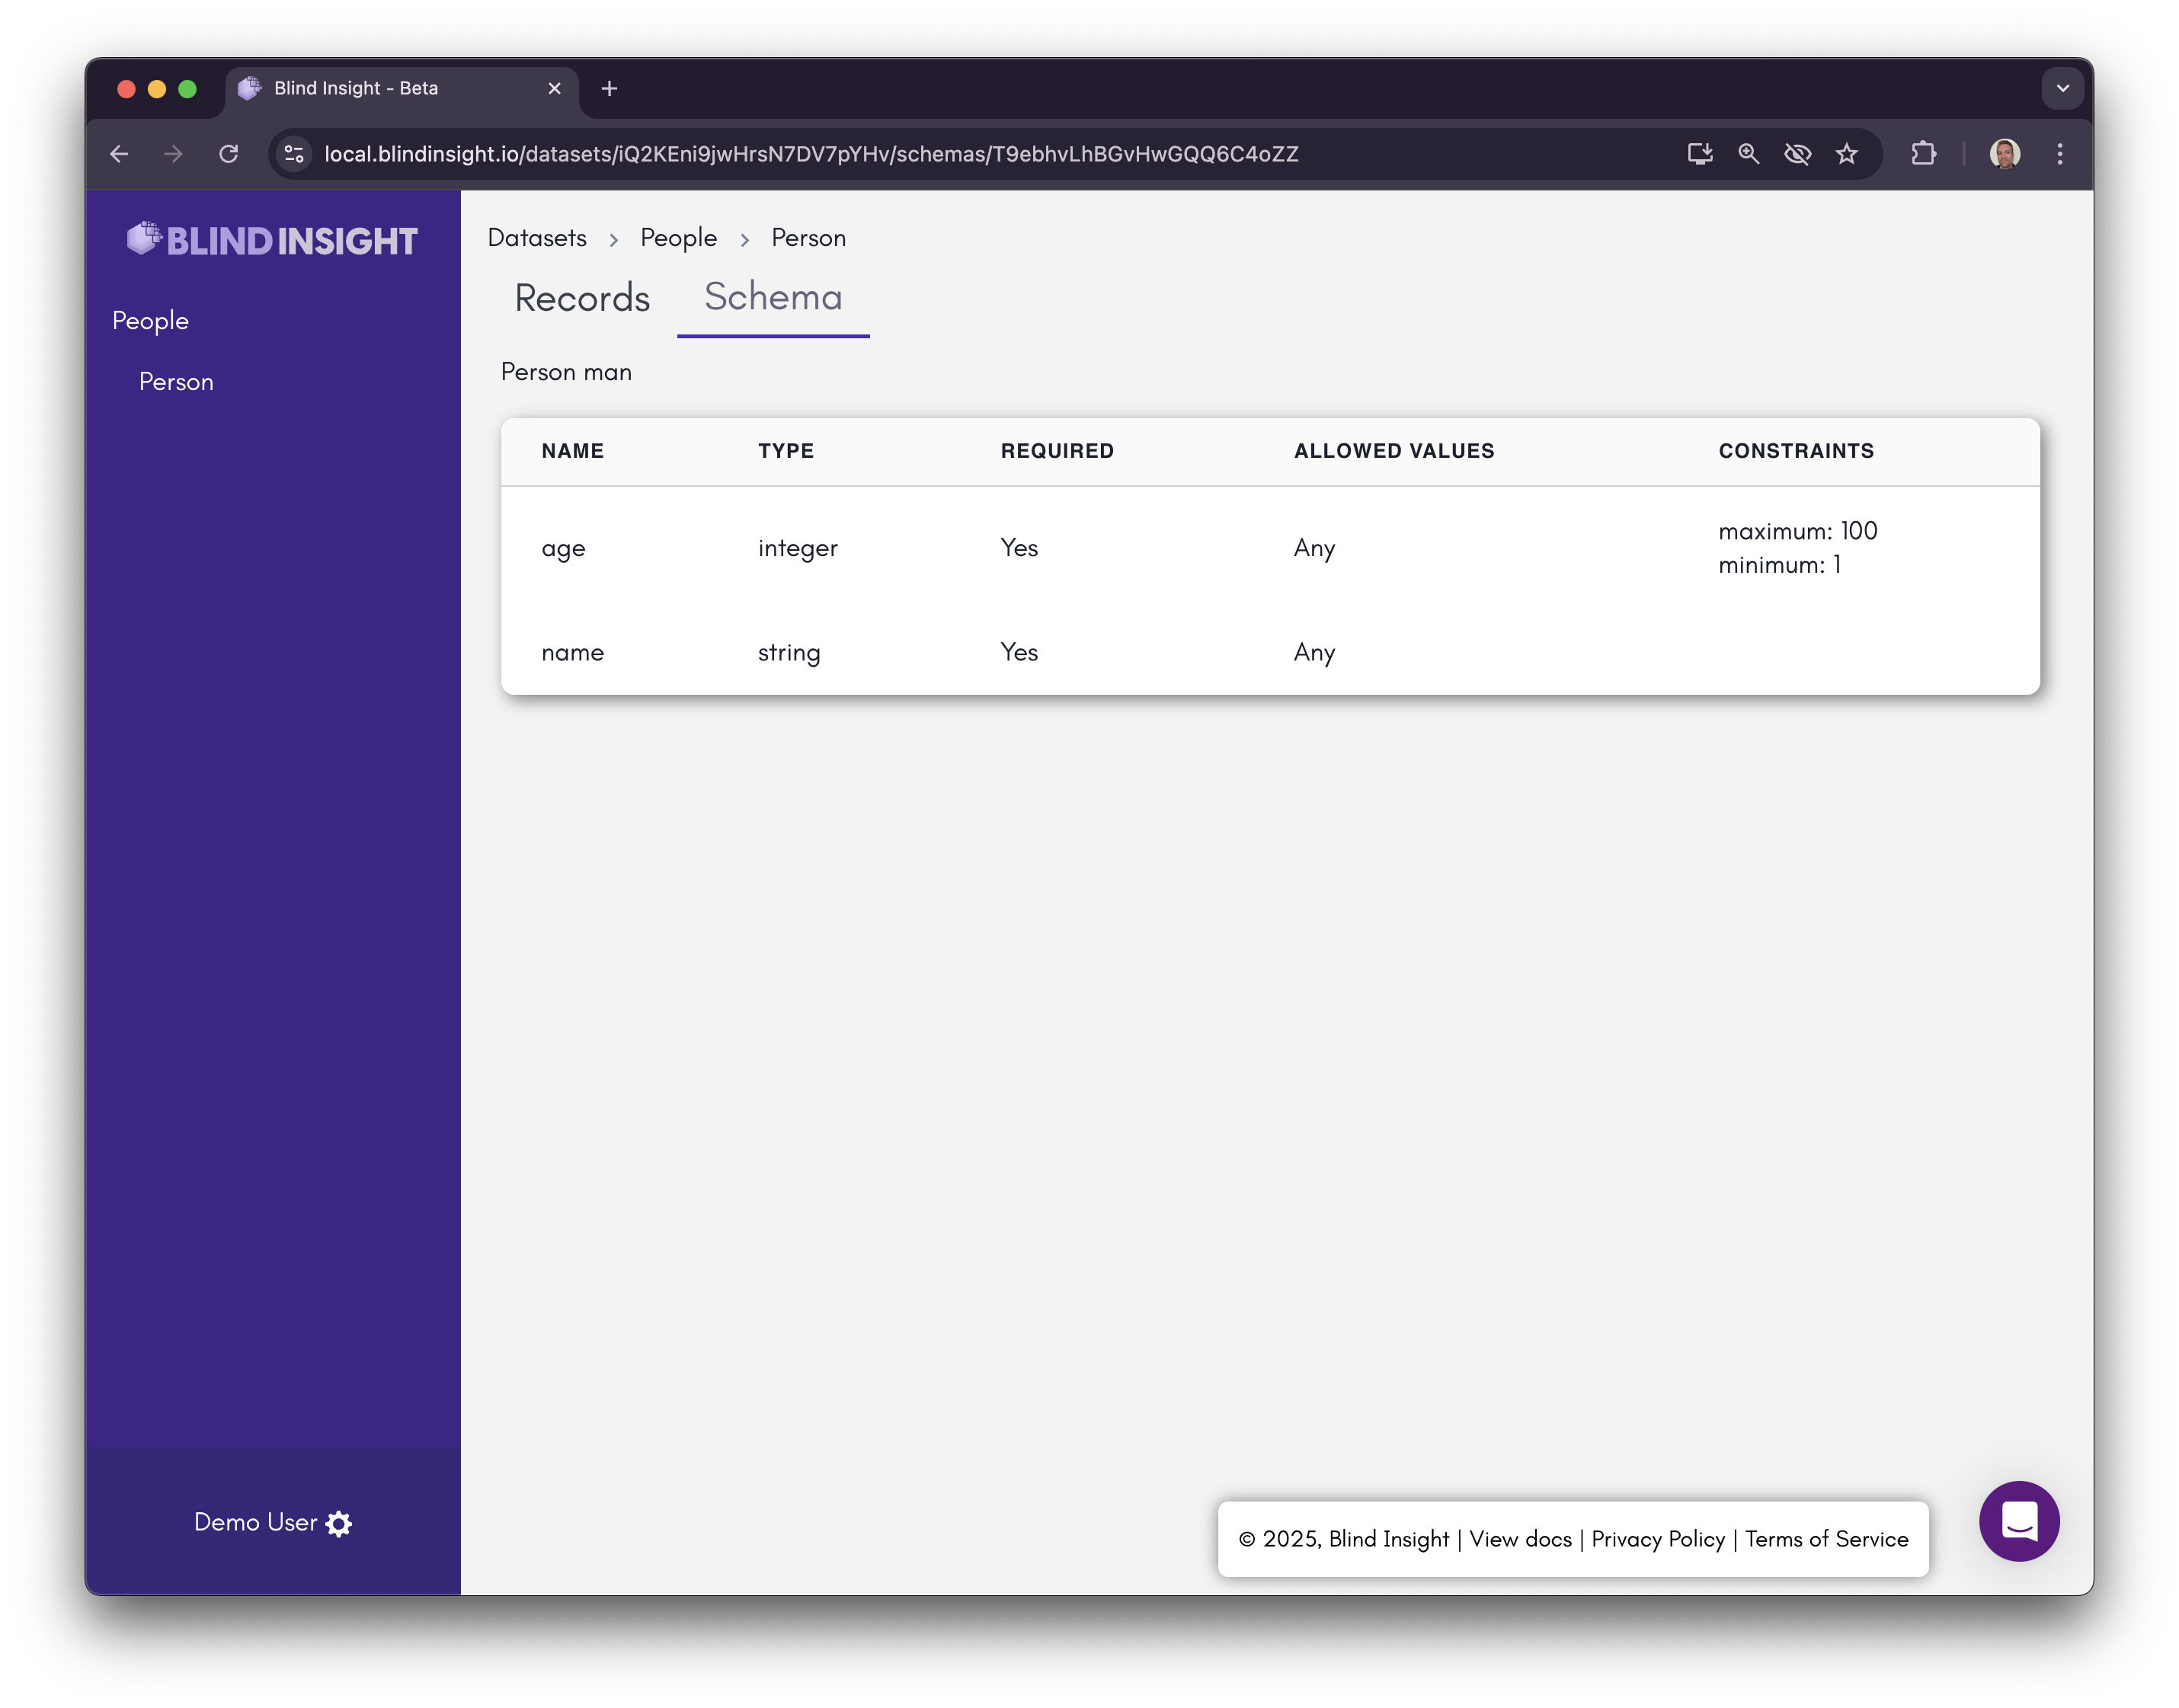
Click on the schema and you’ll be taken to the detail for that schema, displaying the fields and their types.
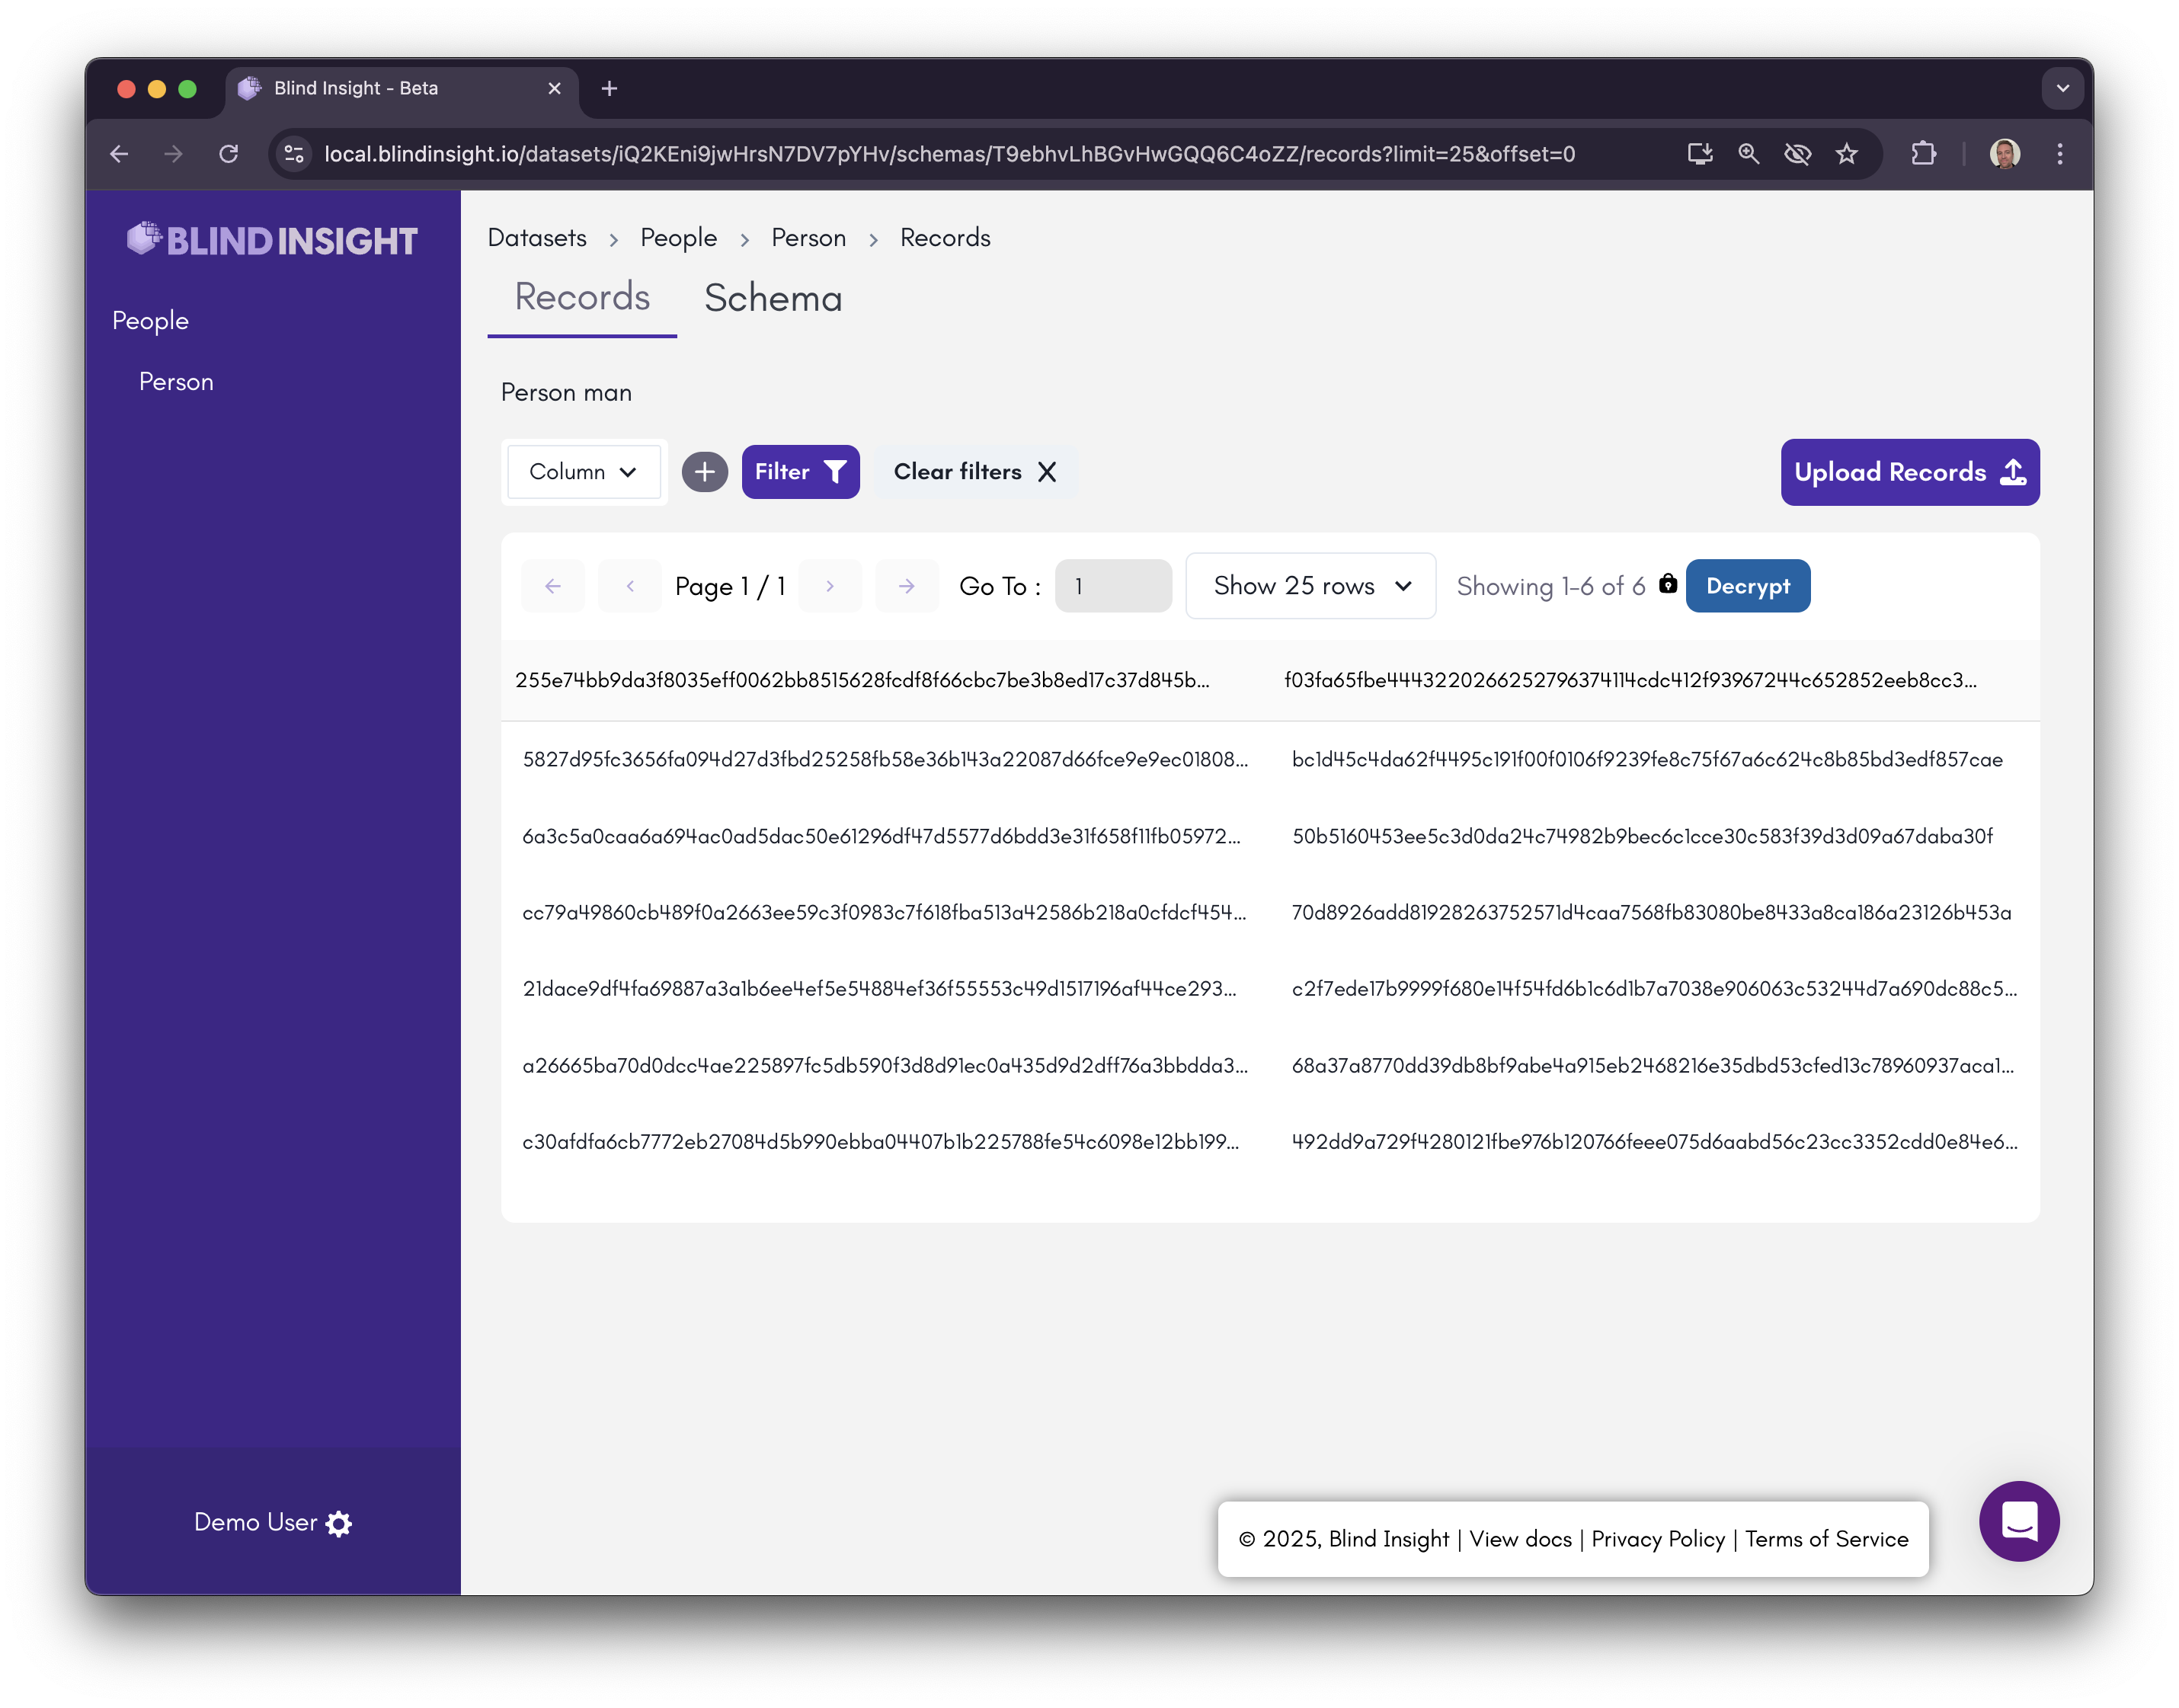
Click on the “Records” tab at the top and you’ll then see the records we uploaded. The proxy detected the keys and has automatically decrypted them.
Encrypted Search

Click on the "Encrypt" button to the right to toggle the records back to their encrypted state.
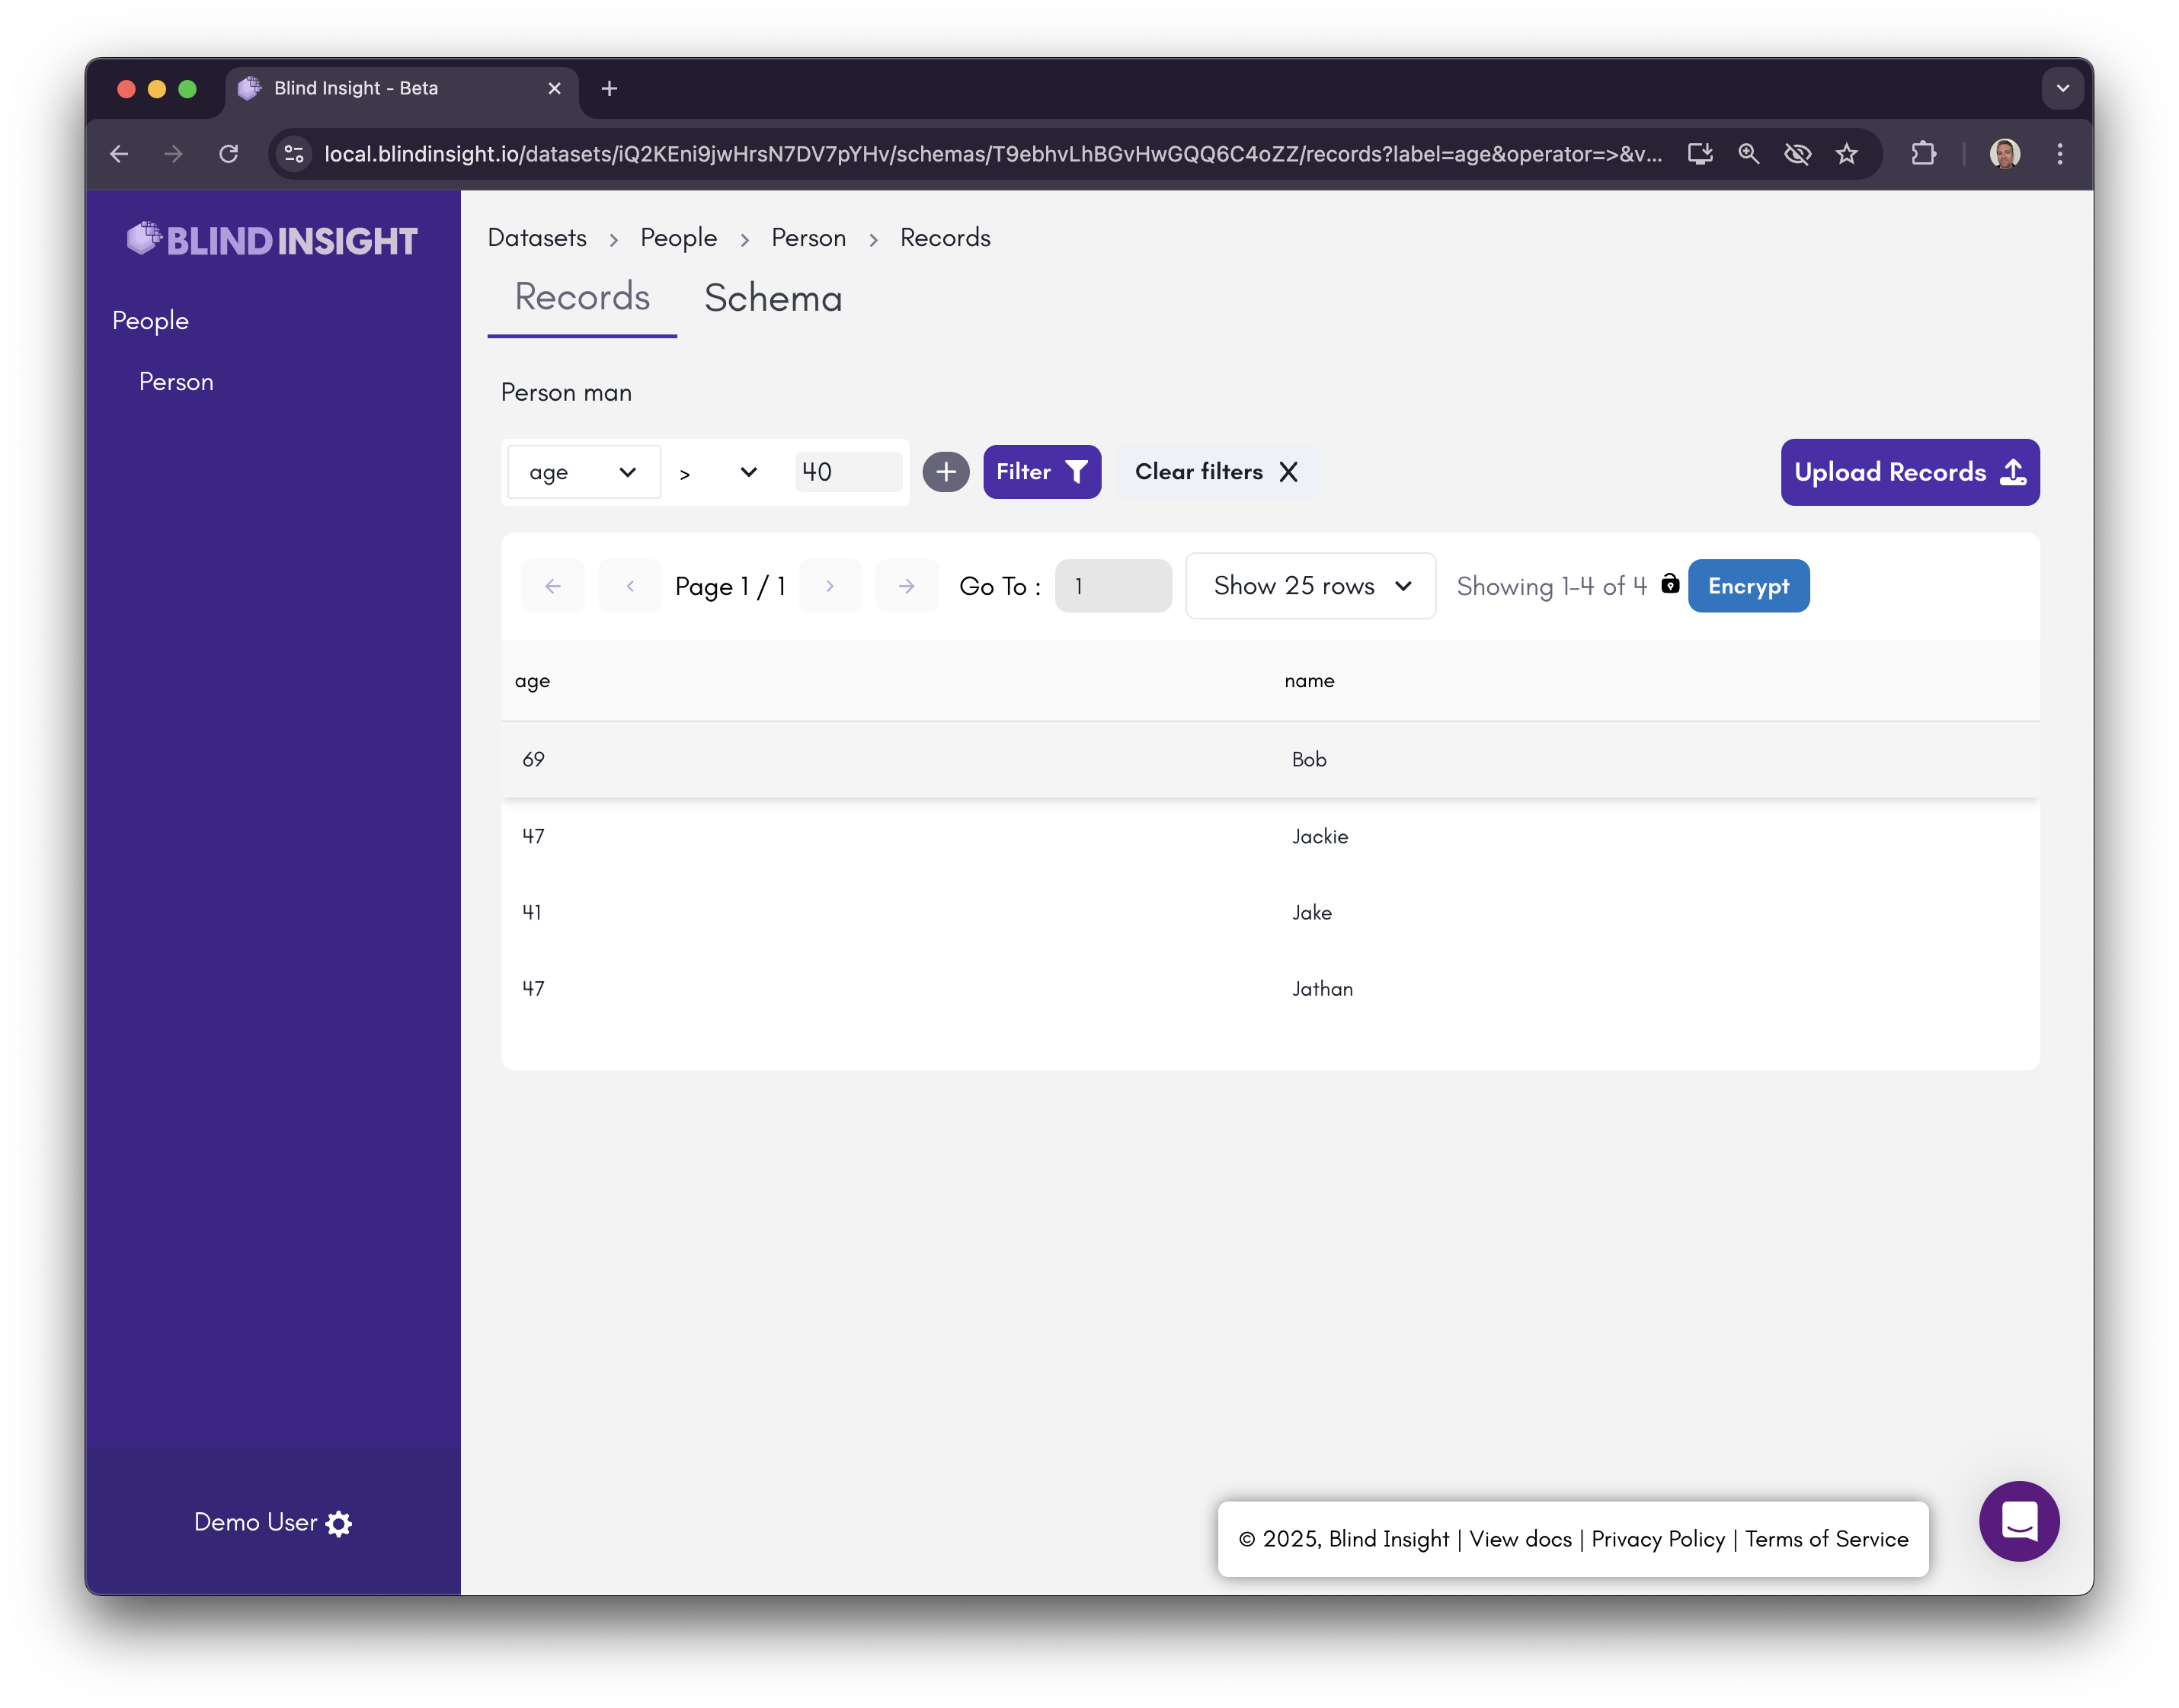
Let’s do an encrypted search on the data. Let’s search for "Age greater than 40" by selecting the “age” field and entering >40 in the input field. Submit the search by clicking the “Filter” button.

Four records returned. Cool! But how can we be sure the search worked? Click the “Decrypt” button and you’ll see the decrypted data gets loaded into your browser!
Play around with the searches and toggling encrypted/decrypted. Review the terminal logs to see what’s really going on! It’s only decrypting your data locally, because...
CLEAR TEXT DATA NEVER ENTERS OR LEAVES BLIND INSIGHT!
A Word on Organizations
Organizations in Blind Insight represent an isolated tenant with its own users and datasets. All permissions are managed at the Organization level. When you register for a new account, you will also create a new Organization of which you will become the owner.
For the purpose of demonstration, the Demo Site users are part of the "Demo" organization. When working with objects in Blind Insight, you must always specify the Organization.
To view the Organizations of which you are a member, run blind organization list:
The output might look like this:
[
  {
    "id": "mR62wFPDbKs8nvoTeCSoZX",
    "url": "http://api.app.blindinsight.io/api/organizations/mR62wFPDbKs8nvoTeCSoZX/",
    "name": "Demo",
    "slug": "demo",
    "created": "2024-05-03T00:01:25.138275Z",
    "modified": "2024-05-03T00:01:25.138407Z",
    "owner": "http://api.app.blindinsight.io/api/organizations/mR62wFPDbKs8nvoTeCSoZX/owner/",
    "is_active": true
  }
]
Note the slug field above. This slug is a URL-safe name for the Organization that will be used for working with objects in the API and from the Proxy CLI.
Troubleshooting
The Blind Proxy is not Working
If you are experiencing issues, please download the latest version of the Blind Proxy from the download page.
The Blind Proxy is under active development, so please ensure you are using the latest version.